
M.G. Mühlhäuser & Söhne
Finest Quality Handmade Knives
Step 5- Drilling the Bolsters and Handle
At this point we drill the knife steel for the handles, bolsters and pommels. Not all of our knives have bolsters and/or pommels, but most have a bolster, depending on the model.
The bolsters and pommels for this knife were cut from a piece of three-foot long piece of 416 stainless steel stock. It is not important for the pieces to be an exact fit at this time, since I will grind them to size later.
So it is back to the drill press to drill the holes. First we drill the bolsters along with the blade. Our bolsters are usually made of stainless steel, brass or nickel silver. On most of our knives we use four pins to hold the bolster to the knife steel. Certain smaller models use three. In this case we are demonstrating with a Warthog, which calls for four 1/8" pins to attach the bolster, and two 1/8" pins to attach the pommel.
You will see that in drilling these holes in the tang, we attach the knife to a flat surface using a clamp. This is for safety. To make things a bit easier, our flat surface is in a milling vise so that we can easily move the blade in order to drill the next hole, without the need to constantly unclamp and re-clamp.
We then determine how many holes are needed to hold the handle. For example, we may use two larger pins to hold the handle, or up to six or even eight. Much of it has to do with aesthetics and what seems to flow best with the knife design. This Warthog will be getting bolsters, pommels, and three handle pins.
Once the handle pin holes are drilled, we will then drill a series of balance holes in the blade. This simply lightens things up in certain areas of the blade. Not all knives we make have balance holes.
With all the holes drilled, we place a set of temporary pins in the bolsters. The inside of the bolster has been surface ground to make it more even and to allow it to sit flush against the tang. Once pinned together, we grind the backs of the bolsters to make them even. This is the part that will be touching the knife scales (handles).
Once that is completed, we grind the front of the bolster to the desired shape – often a simple curve. The reason this is done now is that is very difficult to do so once the bolster has been attached to the knife. Also for this reason, at this time we finish the front edge of the bolster to a nice shine.
Once the front edge of the bolsters have been buffed and polished, they are separated, wrapped and placed back in the production bin to be attached later.

Bolsters are pinned and then clamped together so both the front and back can be ground evenly. Old drill bits make good temporary pins.

Working on a slack portion of a flexible abrasive belt smooths the bolster for a nice, gently rounded effect.


The knife is firmly clamped to a milling vise and we drill the holes for the bolsters, handle and pommel. This must be done before heat treat, or the steel will be much too hard to drill.
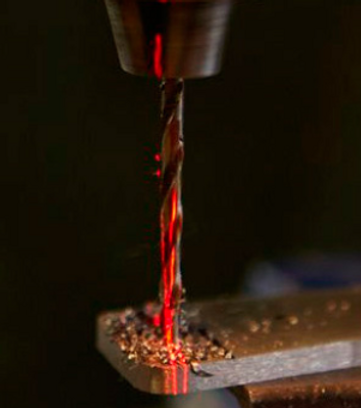
Blade steels must be drilled carefully and slowly in order to not “work harden” the steel.

With the two pieces clamped and pinned, the front edge is ground to its final shape.

Increasingly finer grits are used until a satin finish is achieved. At this point the front of the bolsters must be uniform. As you can see, knifemaking is tough on gloves!
We shine up the front of the bolsters on the buffer. Only the front of the bolster is buffed at this point. These two are almost ready to go on the knife.